Ohje:Visuaalinen muokkain/Käyttöopas
| Huomautus: Muokkaamalla tätä sivua hyväksyt, että tuottamasi sisältö julkaistaan CC0 -lisenssillä. Katso lisätietoja Public Domain -ohjesivulta. |
| Visuaalinen muokkain-portaali |
|---|
 |
| Yleinen |
| Tietoja |
| Osallistu kehittämiseen |
| Jos haluat kokeilla visuaalista muokkainta ilman, että muokkaat jotakin artikkelia, voit vapaasti kokeilla sitä tällä sivulla. Voit muokata kyseistä sivua ilman käyttäjätunnusta. |
Visuaalisen muokkaimen avaaminen
Aloittaminen: visuaalisen muokkaimen työkalurivi
| Visuaalisen muokkaimen työkalurivi näkyy sivun yläosassa, kun aloitat muokkaamisen. Se sisältää joitakin tuttuja symboleja: | |
| Kumoa ja Tee uudelleen suorittamiasi muutoksia. | |
 |
Otsikot-pudotusvalikko: voit valita kappaleelle tyylin. Muuta tyyliä napsauttamalla hiiren osoitin kappaleeseen ja valitsemalla tyyli listasta (sinun ei tarvitse korostaa tekstiä). Osioiden otsikot ovat muodoltaan "Otsikko", ja alaosiot "Alaotsikko 1", "Alaotsikko 2" ja niin edelleen. Normaalifontti tekstille on "Kappale". |
 |
Muotoilu: Valikko avautuu painamalla "A"-painiketta.
Jos et ole valinnut mitään tekstiä ja avaat valikon "A"-painikkeesta, tulee sieltä valitsemasi tyyli automaattisesti tekstiin, jota alat kirjoittaa. |
 |
Linkitystyökalu: Ketjukuvake on linkitystyökalu. Sitä painamalla (yleesä tekstin valinnan jälkeen) avautuu linkki-valintaikkuna. |
 |
Viite-valikko: "Viite"-valikkoa käytetään lähdeviittausten lisäämiseen. Kaikissa projekteissa on mahdollisuus hyödyntää yksinkertaista lähdemuotoilua sekä käyttää viitteitä uudelleen tämän valikon avulla. |
 |
Viittaa-painike: Jos wikissäsi on otettu käyttöön Citoid-palvelu ja/tai viittaustyökalu, näet Viite-valikon sijaan Viittaa-painikkeen.
(Ohjeet paikallisten viittausmallineiden lisäämiseksi Manuaalinen-valikkoon tietyssä wikissä löytyvät sivulta Visuaalinen muokkain/Viittaustyökalu.) Ohjeet Automaattinen-välilehden käyttöön ottamiseksi omassa wikissäsi on saatavilla täällä Citoid-palvelu yrittää täyttää viitemallineet automaattisesti. |
 |
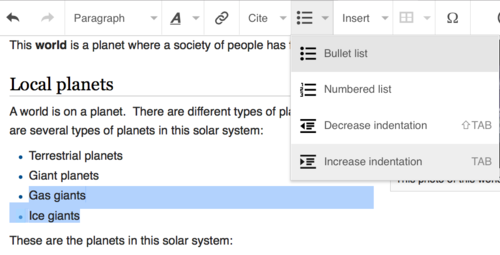
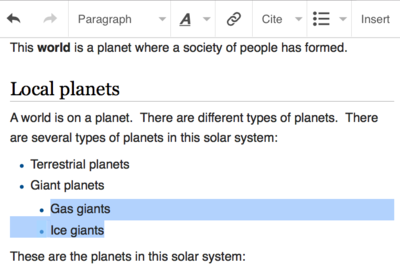
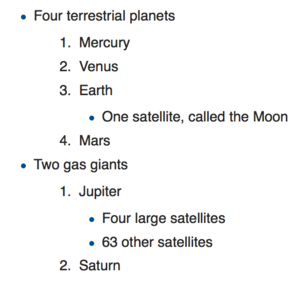
Listat ja sisennys: kaksi ensimmäistä kohdetta mahdollistavat tekstin muotoilun joko "Luettelo"- tai "Numeroitu luettelo" -muotoon. Kahden viimeisen kohteen avulla voit vähentää tai lisätä luettelokohteiden sisennystasoa. |
 |
Lisää: "Lisää"-valikko voi olla erilainen joissakin projekteissa. Alla on lista kaikista vaihtoehdoista, joita siinä saattaa olla.
|
| Erikoismerkin lisääminen: "Erikoismerkit" (Ω) -kuvake on "Lisää" -valikon vieressä. Siitä avautuvassa ikkunassa on paljon erikoismerkkejä, joita voit lisätä tekstiin merkkiä klikkaamalla. Tarjolla on muun muassa joitain vakiosymboleja, tarkkeita ja matemaattisia symboleja. (Tätä listaa on mahdollista muokata paikallisesti. Katso ohjeet sivulta Visuaalinen muokkain/Erikoismerkit.) | |
| Painike muokkausilmoitukset näyttää sivun mahdolliset ilmoitukset. | |
 |
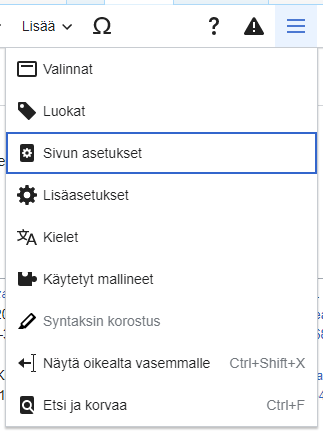
Sivun valinnat -valikko on painikkeiden Julkaise muutokset ja Vaihda muokkainta vasemmalla puolella. Valikkolistan Valinnat-vaihtoehdosta avautuu valintaikkuna, jossa on seuraavat (vasemmalla olevat) välilehdet:
Valinnat-valintaikkunan välilehdet näkyvät myös Sivun valinnat-valikossa, ja ne voi avata klikkaamalla. Lisäksi Sivun valinnat-valikko sisältää toiminnot Näytä vasemmalta oikealle ja Näytä oikealta vasemmalle sekä Etsi ja korvaa, jolla voit erilaisin asetuksin hakea sanoja ja säännöllisiä lausekkeita sekä korvata niitä. |
| Vaihda muokkainta -painike on Julkaise muutokset -painikkeen vieressä. Sen avulla voit vaihtaa wikitekstin muokkaimeen. | |
Muokkausten julkaiseminen
Linkkien muokkaaminen
 |
Linkkejä voi lisätä työkalurivillä olevalla "Linkki"-kuvakkeella (ketju) tai käyttämällä pikanäppäintä Ctrl+K (tai ⌘ Command+K Macissa).
Jos valitset (maalaat) tekstiä ja painat sitten ”Linkki”-painiketta, käytetään tätä tekstiä linkin luomisessa. Jos linkissä on vain yksi sana, voit joko valita sanan tai laittaa osoittimen sanan sisälle. |
 |
Painikkeesta tai oikotietä käyttämällä avautuu valintaikkuna, johon voit kirjoittaa linkin.
Linkkityökalu yrittää auttaa sisäisten linkkien lisäämisessä hakemalla todennäköisiä vastaavuuksia. Kun olet kirjoittanut tai valinnut linkin, viimeistele linkittämisprosessi painamalla ↵ Enter tai napsauttamalla "Valmis"-painiketta. Linkkisi ilmestyy välittömästi sivulle, mutta kuten muutkin muutokset, sitä ei julkaista ennen kuin julkaiset koko sivun. |
 |
Muun verkkosivuston sivulle linkittämisessä prosessi on samanlainen: Valitse "Ulkoinen sivusto"-välilehti ja kirjoita URL-osoite ruutuun. |
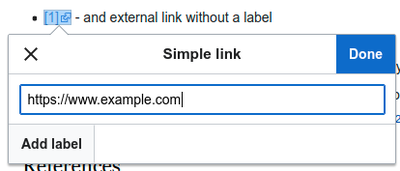 |
Ulkoiset linkit ilman selitettä näyttävät tältä: [1]. Voit lisätä niitä sijoittamalla kursorisi sanojen ulkopuolelle (esim. välilyönnin jälkeen). Avaa linkkityökalu painamalla painiketta tai pikanäppäimiä. Kirjoita URL-osoite laatikkoon ja paina ”Valmis”-painiketta lisätäksesi linkin. |
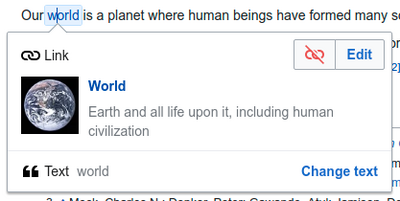 |
Kun haluat muuttaa tai poistaa olemassa olevan linkin, klikkaa linkin tekstiä, jolloin sen lähelle ilmestyy "Linkki"-valintaikkuna. (Pääset valintaikkunaan myös Ctrl+K -näppäinyhdistelmällä.) Kun linkki on valittu, se näkyy sinisellä taustalla.
Linkin muokkaus -valintaikkunassa voit muuttaa sitä, mihin linkki vie. Voit myös poistaa linkin kokonaan painamalla oikeassa yläkulmassa olevaa punaista "Poista"-painiketta (renkaat, joiden yli menee viiva). Voit myös avata linkin kohteen toisessa ikkunassa painamalla valintaikkunassa näkyvää linkin kopiota. (Voit haluta tehdä tämän tarkistaaksesi, onko ulkoinen linkki kelvollinen.) Jos haluat poistua linkkitekstistä (linkkinä näytettävä tekstipätkä) tai jatkaa kirjoittamista linkin perään, paina →:
Muokataksesi olemassa olevaa linkkitekstiä paina jotakin kohtaa linkkitekstissä ja aloita kirjoittaminen. Mutta jos haluat korvata koko tekstin, huomaa että:
|
Lähteiden muokkaaminen
- Katso myös: Ohjeita viitemallineiden käyttämiseen tai Ohjeita citoidin Automaattinen-painikkeen käyttämiseen
|
Mikä viitejärjestelmä on käytössä? | |
| Wikisi voi käyttää yhtä kolmesta viitejärjestelmästä. Oikealla näkyvä on yksinkertaisin viitejärjestelmä, jossa "Viite"-valikko ei sisällä yhtään viitemallinetta. Jos wikisi käyttää tätä järjestelmää, kaikki tarvitsemasi tieto lähdeviitteistä on tällä sivulla. |  |
 | |
| Toisessa järjestelmässä aloitat jälleen painamalla Viittaa-painiketta. Tällöin avautuu valikko, joka sisältää useita suosittuja viitemallineita asetettuna helposti löydettäviksi "Manuaalinen"-välilehdelle. Jos wikisi käyttää tätä järjestelmää, löydät lisätietoa sivulta Help:VisualEditor/User guide/Citations-Templates |  |
| Kolmannessa järjestelmässä aloitat jälleen painamalla Viittaa-painiketta. Tällöin avautuu valikko, joka sisältää automaattisen viittausprosessin, joka hyödyntää citoid-palvelua. Jos wikisi käyttää tätä järjestelmää, löydät lisätietoa sivulta Ohje:Visuaalinen muokkain/Käyttöopas/Viitteet – täysi opas |  |
|
Jo löytyvän lähteen muokkaaminen | |
| Muokataksesi jo löytyvää lähdettä, napsauta sitä tekstissä (yleensä numerona hakasulkeiden sisällä). Näet joko "Lähde"-kuvakkeen (kirjanmerkki) tai kuvakkeen (ja nimen) mallineelle, jota on käytetty kyseisen lähdeviitteen luomiseen. Kummassakin tapauksessa painamalla "Muokkaa"-painiketta aukeaa valikko, jossa voit muokata lähdettä. |  |
| "Lähde"-kuvakkeelle "Muokkaa"-painikkeen klikkaaminen avaa lähdeikkunan. Aloita lähteen tietojen muuttaminen painamalla sitä.
Monet wikit käyttävät mallineita lähteiden muotoilemiseen. Jos lähteessäsi käytetään mallinetta, siirtämällä kursorin lähdetietojen päälle, kaikki kyseisessä kentässä olevat tiedot näkyvät korostettuina. Jos mallinetta on käytetty ja painat lähdetietoja, Malline-kuvake (palapelin pala) tulee esiin eräiden tietojen kera. Paina "Muokkaa"-painiketta muokataksesi mallineen sisältöä mallinemuokkausikkunassa. |
 |
| Jos painaessasi lähdekuvaketta esiin tulee vakiolähdeviitemalline (esimerkki oikealla), siinä tapauksessa painamalla "Muokkaa" aukeaa mallineen muokkausikkuna. |  |
| Mallinemuokkaimen sisällä voit lisätä tai poistaa näytettäviä tietoja tai muuttaa olemassa olevaa sisältöä. Ainoastaan kentät (mallineen parametrit), joissa on sisältöä, nykyvät alussa. Lisätäksesi kenttiä napsauta "Lisää" muokkaimen alalaidassa. |  |
| Kun olet valmis, paina "Hyväksy muutokset". | |
Jo löytyvän lähteen uudelleenkäyttäminen | |
| Jos sivu sisältää jo viittauksen, joka koskee myös tekstiä, jonka haluat lähteistää, siinä tapauksessa voit valita uudelleenkäyttää olemassa olevaa viittausta.
Uudelleenkäyttääksesi jo olemassaolevaa lähdettä, laita kursorisi sinne kohtaan tekstissä, johon haluat lisätä kyseisen lähdeviitteen. Napsauta sitten "Käytä uudelleen" -toimintoa "Viite"-valikossa. (Huom. jos wikisi käyttää yllä kuvailtuja toista tai kolmatta viitejärjestelmää, näet "Uudelleenkäyttö"-välilehden valikossa "Käytä uudelleen" -toiminnon sijaan.) |
 |
| Etsi "Lähde"-ikkunan listasta se lähde, jota haluat uudelleenkäyttää ja valitse se. Jos sivu sisältää useita lähteitä, voit käyttää hakulaatikkoa (otsikoitu "Etsi nykyisistä viitteistä") etsiäksesi listalta vain ne lähteet, jotka sisältävät tietyn tekstin. |  |
Uuden lähteen lisääminen | |
| Lisätäksesi uuden lähteen käyttäen "Viite"-valikkoa, laita kursori sinne kohtaan tekstiä, minne haluat lisätä sen. Klikkaa sitten "Normaali"-vaihtoehtoa. |  |
"Normaali"-viitteen käyttäminen | |
| Tässä näytetään, mitä näet, jos valiset perusviitteen. Lähdemuokkaimessa voit lisätä viitteen sekä muotoilla sitä.
Voit valita lähteen kuulumaan tiettyyn ryhmään, vaikka normaalisti tämä jätetään tyhjäksi. (Tätä vaihtoehtoa käytetään lähderyhmien näyttämiseksi "Lähdeluettelo"-työkalulla.) |
 |
| Jos haluat lisätä lähdeikkunnassa viitemallineen tai minkä tahansa muun mallineen uuteen lähteeseesi, napsauta lähdemuokkaimen "Lisää"-työkaluvalikossa olevaa "Malline"-kuvaketta (palapelin pala). |  |
| Sitten etsi malline, jota haluat käyttää, lisää se ja muokkaa sitä kuten tekisit mille tahansa muulle mallineelle. (Katso Mallineiden muokkaaminen -osio alempana, jos tarvitset ohjeita mallineisiin.)
Kun olet saanut uuden mallineen muokkaamisen tehtyä, paina "Hyväksy muutokset" palataksesi viitemuokkaimeen, ja "Hyväksy muutokset" uudelleen palataksesi sivulle, jota olet muokkaamassa. |
 |
| Jos sivulla ei ole vielä luetteloa lähteistä (esimerkiksi jos olet lisäämässä sivulle ensimmäistä lähdettä), sinun täytyy lisätä se, jotta lähteeseen lisäämäsi teksti näkyy sivulla.
Laita kursori sinne missä haluat näyttää lähdeluettelon (yleensä sivun alaosassa), avaa "Lisää"-valikko ja paina kuvaketta "Lähdeluettelo" (kolme kirjaa). |
 |
| Jos käytät useita eri viiteryhmiä, mikä on suhteellisen harvinaista, voit määrittää ryhmän tässä valintaikkunassa. Ainoastaan viitteet, jotka kuuluvat kyseiseen ryhmään, näytetään sivulla siinä kohdassa, johon olet asettamassa kyseisen ryhmän.
The final step in the References list dialog is to press "Lisää". |
 |
Vakioviitemallineiden käyttäminen | |
| Your local wiki may have added extra citation templates to the "Viite" menu. If so, you have quick access to the most-used citation templates for your wiki. (Instructions for adding extra citation templates to your local wiki are available at Visuaalinen muokkain/Viittaustyökalu.) |  |
| Pressing on a template icon such as "Cite book" will take you into the template editor for that template. Important information fields may be marked with an asterisk. While the most common fields will be shown, not all of them are required. |  |
| To add more parameters, scroll down in the template editor and press on the "Lisää" option.
Kun olet valmis, paina "Lisää". |
 |
Kuvien ja muiden mediatiedostojen muokkaaminen
Kuvien tallentaminen
Gallerioiden muokkaaminen
Mallineiden muokkaaminen
The powerful MediaWiki template system lets you insert dynamic content, text from other pages, and much more. For a detailed explanation and examples, see the Templates help page.
In the VisualEditor you can search for a relevant template, add an invocation or transclusion on the page you’re editing and, if needed, add custom content using parameters.
Uuden mallineen lisääminen
| Lisätäksesi uuden mallineen sivulle, aseta kursori sinne kohtaa sivua, johon haluat mallineen lisättävän. Sitten avaa "Lisää"-valikko ja valitse " |
 |
| Löydä haluamasi malline kirjoittamalla sen nimi tai asiaankuuluva avainsana. Tulokset, jotka sisältävät hakutermin joko nimissä tai kuvauksessa, näytetään pudotusvalikossa. Tämän tulisi auttaa sinua löytämään oikea malline, vaikka et tietäisi sen täsmällistä nimeä.
Jos sinulla on ongelmia löytää sopivanlaista mallinetta hakusanoilla, voit mennä muille samankaltaista sisältöä sisältävillä wikisivuille ja katsoa wikitekstistä, mitä mallineita ne käyttävät. Kun löydät halutun mallineen nimen, voit kirjoittaa se tähän kenttään ja lisätä sen tänne. |
 |
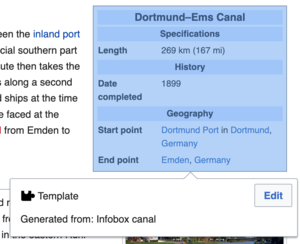
| Voit myös muokata jo sivulla olevaa mallinetta. Kun valitset mallineen muokattavaksi, se muuttuu siniseksi ja esiin tulee laatikko, jossa lukee " |
 |
| Osa mallineista ei ole näkyvissä lukijoille. Visuaalisessa muokkaimessa tällaiset piilotetut mallineet näytetään silti, jotta voit klikata ja muokata tai poistaa niitä. Mallineen nimi näytetään palapelikuvakkeen vierellä ja kumpikin ovat värjätty harmaalla. |  |
|
Mallineen parametrit | |
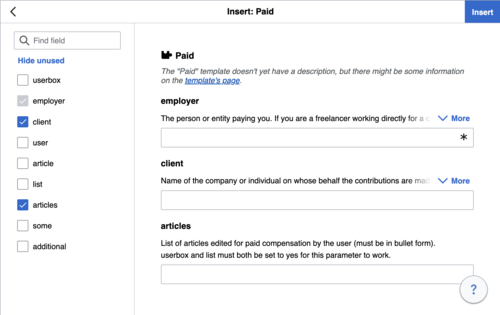
| Näet tämän valintaikkunan, kun lisäät uutta mallinetta tai muokkaan jo olemassa olevaa mallinetta. Se, mitä näet laatikossa, riippuu siitä, sisältääkö kyseinen malline mallinetietoja (TemplateData), eli hyödyllistä metadataa, jota muut muokkaajat ovat lisänneet mallineiden muokkaamisen helpottamiseksi visuaalisessa muokkaimessa.
Kun malline sisältää TemplateDataa, visuaalinen muokkain voi käyttää sitä näyttääkseen selityksin varustettujen kenttiä, joihin voit täyttää tiedot.
|
 |
| You can disable any optional parameter (which have blue checkboxes on the left side). If a parameter’s checkbox is grayed out and not clickable, the template requires that parameter, so it can’t be disabled.
When you insert a new template, you may find that some optional parameters are pre-selected. That means the author(s) of the template recommends the use of those parameters. It’s best to review all parameters that will be used in a template to ensure you understand their use. Clicking an unchecked parameter adds it to the template. Clicking a parameter that’s already been added takes you to the parameter’s input field. Some template parameters will show as “deprecated”. Don’t use deprecated parameters when inserting a template; they’re only visible to you because those parameters are in use on older pages where this template was included. |
 |
|
Dokumentoimattomien parametrien lisääminen | |
| If you’re inserting or editing a template whose author hasn’t laid out its parameters in TemplateData, it has what we call “undocumented” or “unnamed parameters”. In these cases, you should consult the page for the template itself. There you can learn how to correctly employ and work with all of the template’s parameters. This includes learning the exact names of the parameters as written by the template author.
If you find in the documentation that the template expects parameters without names, fill in numbers as placeholders for the parameter names using the undocumented parameter input, then add text to the values you want to provide as you normally would. Esimerkki:
If you accidentally include nonexistent, misspelled or erroneous parameters, the values you enter for those parameters won’t show up on the page you’re editing. |
 |
|
Automaattisesti luodut parametrit | |
| In this example, the template in question lacks TemplateData but it was possible to autogenerate the parameters. This means that the undocumented parameters have already been added for you, but the names may not be easily understandable and the dialog cannot display any directions or descriptions. As a result the dialog box provides a link to the template’s documentation, which should help you deduce and fill in the template’s various parameters. |  |
|
Useasta mallineesta koostuvan sisällön muokkaaminen | |
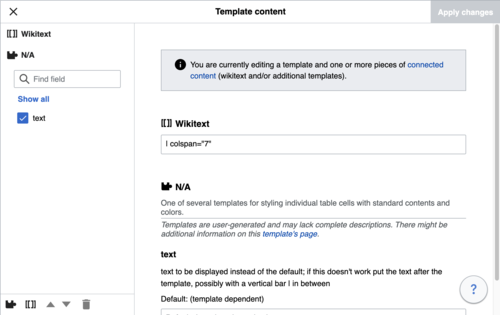
| During editing, you may open template content consisting of multiple templates or a single template linked to some wikitext. This differs from the nested templates described below. In this case, the templates are better visualized as being stacked or connected.
This content often contains “unbalanced templates,” templates which are incomplete on their own and need to be paired with some wikitext or another template in order to function. These related pieces of template content must be created in wikitext, but can be edited in the VisualEditor. In these cases you will see a notice at the top of the dialog to signal the situation and a specialized toolbar will be visible at the bottom of the sidebar. There you can use the icon buttons to add additional templates, additional wikitext, delete elements or change their order. |
 |
|
Sisäkkäiset mallineet | |
| Templates can include other templates as the value for parameters. You’ll recognize it when you see a parameter whose value contains the double curly braces ( {{ }} ) denoting a template.
The VisualEditor can’t present this template within a template (a nested template) using the editor’s easy-to-use interface, so if you want to nest a template yourself, you’ll need to understand how to add the template by hand in wikitext into the appropriate parameter field. |
 |
|
Muokkauksen loppuun saattaminen | |
| Kun olet saanut mallineen muokkauksen valmiiksi, voit painaa "Hyväksy muutokset". Tällöin voit esikatsella muokkaustasi ja varmistaa, että se näyttää siltä kuin haluat.
You may also see an error message, which (like the other TemplateData mentioned above) is community-provided content and may vary in usefulness. You may need to consult the template’s own documentation to get to the bottom of some errors. If you’re still having trouble, consider posting about your problem on the template’s talk page. |
|
|
Mallineen poistaminen | |
| Poistaaksesi mallineen visuaalisessa muokkaimessa, klikkaa mallinelaatikkoa. Paina "Delete"- tai "Askelpalautin"-näppäintä näppäimistölläsi. Malline poistuu sivulta. |  |
|
Muokkaus mobiilissa | |
| When editing a template on a page using the VisualEditor on a mobile device, you’ll see that the sidebar starts out hidden. You can make it visible by pressing the “Show/hide options” button. |  |
Mallineiden substaaminen | |
| When you insert a template in a wiki page, its content and appearance are reevaluated every time the page loads, based on the template code and the values of its parameters. This means if someone updates the code of a template, then every page which uses that template will also get updated when they publish.
There’s another, much less common way to use templates, though, and that’s to substitute a template. Doing this permanently includes the template content just as it appears at the moment you insert it. It will not update if the template code is later changed. Most users won’t ever need to resort to substitution. Substitution is typically only useful when you need to capture the exact appearance of one version of a template, such as when content is under development and needs evaluation. To substitute a template in the VisualEditor, insert a template using the name syntax When you’re finished, press “Lisää”, which will insert the template content as you see it. |
 |
Luetteloiden muokkaaminen
Taulukoiden muokkaaminen
Luokkien muokkaaminen
 |
Muokataksesi luokkia, paina "Sivun valinnat" -valikossa kohtaa "Luokat". |
 |
"Luokat" -painike avaa uuden ikkunan, joka luetteloi sivulla olevat luokat, ja mahdollistaa sinun lisätä uusia tai poistaa jo lisättyjä luokkia.
Voit myös asettaa tai muuttaa yleistä (oletus) aakkostusavainta, joka määrittää, missä kohtaa luokkaa sivu näkyy, kun samassa luokassa on useita sivuja. Esimerkiksi oletusaakkostus artikkelille "Kimi Räikkönen" on "Räikkönen, Kimi". Se näkyy luokassa "Suomalaiset Formula 1 -kuljettajat" kirjaimen "R" kohdalla, ei kirjaimen "K" kohdalla. |
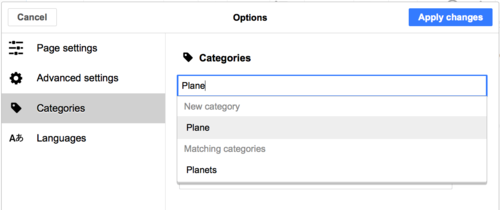 |
Lisätäksesi luokan sivulle, anna luokan nimi kenttään "Lisää luokka". Kirjoittaessasi visuaalinen muokkain etsii mahdollisia vastaavia, jo luotuja luokkia. Voit joko valita jo luodun luokan, tai lisätä luokan, jota ei ole vielä olemassa. (Siihen asti, kun luokkaa ei ole olemassa, luokkaan osoittava linkki näkyy punaisena julkaistuasi muutokset.) |
 |
Poistaaksesi sivulla jo valmiina olevan luokan, paina sitä, ja sen jälkeen paina aukeavassa valintaikkunassa olevaa "Poista"-kuvaketta (roskakori).
Voit myös määrittää siellä aakkostusavaimen tälle tietylle luokalle. Tällainen aakkostusavain korvaa oletuksena olevan aakkostusavaimen. |
| Suoritettuasi luokkien muokkaamisen, paina "Hyväksy muutokset" palataksesi sivun muokkaustilaan. | |
Sivun asetusten muokkaaminen
Karttojen muokkaaminen
 |
Voit lisätä ja muokata karttoja. Katso Ohje:Visuaalinen muokkain/Käyttöopas/Kartat. |
Matemaattisten kaavojen muokkaaminen
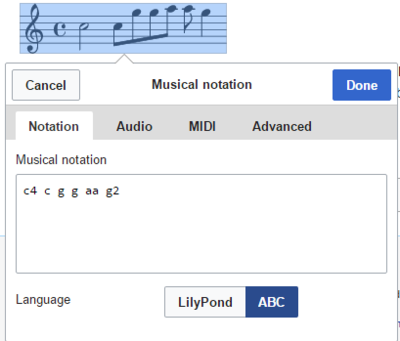
Nuottikirjoituksen muokkaaminen
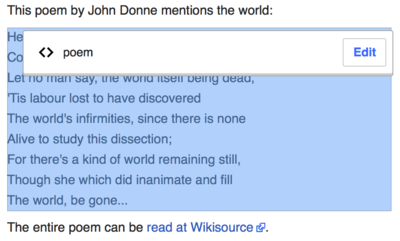
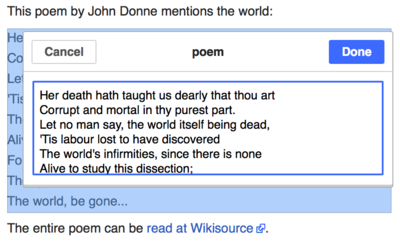
Runojen ja muiden erikoisten kohteiden muokkaaminen
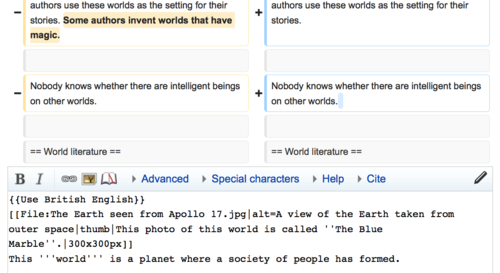
Visuaalisen muokkaimen ja wikitekstimuokkaimen välillä vaihtaminen
Pikanäppäimet
Monet muokkaajat ovat tottuneet syöttämään wikitekstiä suoraan, erityisesti lihavoidakseen, kursivoidakseen ja lisätäkseen wikilinkkejä. Pikanäppäinten avulla voit nopeasti asettaa vastaavia muotoiluja, ilman että tarvitsee napsauttaa työkalurivin kohteita. Tässä ovat yleiset pikanäppäimet Visuaalisessa muokkaimessa:
| PC:n pikanäppäin | Toiminto | Macin pikanäppäin |
|---|---|---|
| Ctrl+B | Lihavointi | ⌘ Cmd+B |
| Ctrl+I | Kursivointi | ⌘ Cmd+I |
| Ctrl+K | Aseta linkki | ⌘ Cmd+K |
| Ctrl+X | Leikkaa | ⌘ Cmd+X |
| Ctrl+C | Kopioi | ⌘ Cmd+C |
| Ctrl+V | Liitä | ⌘ Cmd+V |
| Ctrl+Z | Kumoa | ⌘ Cmd+Z |
Katso myös lista kaikista pikanäppäimistä.


