Help:Візуальны рэдактар/Дапаможнік
| Заўвага: Рэдагуючы гэтую старонку, Вы даеце згоду на зьмяшчэньне свайго ўнёску пад CC0. Падрабязьней глядзіце Public Domain Help Pages. |
| VisualEditor portal |
|---|
 |
| General |
| Пра праект |
| Дапамагчы з запускам |
| If you would like to try the visual editor without editing an article, here is a page where you can freely test it. You don't need an account to use the visual editor on that page. |
Адкрыцьцё візуальнага рэдактара
Пачатак працы: панэль інструмэнтаў візуальнага рэдактара
| Калі вы пачынаеце рэдагаваньне з дапамогай візуальнага рэдактару, уверсе старонкі знаходзіцца яго панэль інструмэнтаў. Яна зьмяшчае некаторыя ўжо знаёмыя значкі: | |
| Скасаваць або Аднавіць зробленыя вамі зьмены. | |
 |
Headings pull-down menu: allows you to change how the paragraph is formatted. To change the style of a paragraph, put your cursor in the paragraph and select an item in this menu (you don't have to highlight any text). Section titles are formatted "Загаловак", and subsections are "Падзагаловак 1", "Падзагаловак 2", and so on. The normal format for text is "Параграф". |
 |
Фарматаваньне: націсканьне на «A» адкрывае мэню.
If you have not selected any text, then when you press the "A" to open the menu, and then select an item, that formatting will apply to the text that you start typing, from wherever your cursor is located. |
 |
Linking tool: The chain icon is the linking tool. Pressing on it (usually after selecting some text) opens the link dialog. |
 |
Крыніцы menu: The "Крыніцы" menu is used to add inline citations (also called "footnotes" or "references"). All projects have access to basic reference formatting and the ability to reuse citations by using this menu. |
 |
Цытаваць button: If the Citoid service and/or citation tool is enabled on your wiki, you will see a Цытаваць button instead of a Крыніцы menu.
Instructions for adding local citation templates to the "Уручную" tab at a specific wiki are available at VisualEditor/Citation tool. Instructions for enabling the Аўтаматычна tab are available at Enabling Citoid on your wiki The citoid service tries to fill out citation templates automatically. |
 |
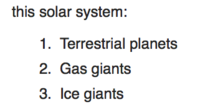
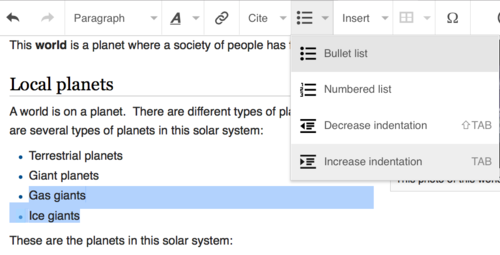
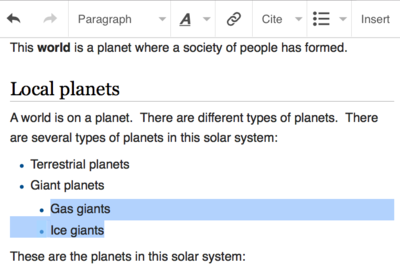
Сьпісы і водступы: першыя два пункты дазваляюць фарматаваць тэкст як «Маркіраваны сьпіс» або «Нумараваны сьпіс». Іншыя два пункты дазваляюць паменшыць ці павялічыць водступ паміж элемэнтамі сьпісу. |
 |
Уставіць: пункт «Уставіць» можа адрозьнівацца ў залежнасьці ад праекту. Ніжэй знаходзіцца сьпіс усіх магчымых дзеяньняў.
|
| Special character insertion: The "Спэцыяльны сымбаль" (Ω) icon is next to the "Уставіць" menu. When pressed, it displays a dialog showing many special characters. By pressing on a specific character, you place it into the text. These special characters include some standard symbols, diacritics, and mathematical symbols. (This list may be customized locally. See VisualEditor/Special characters for instructions.) | |
| The Edit notices button displays any notices for the page. | |
 |
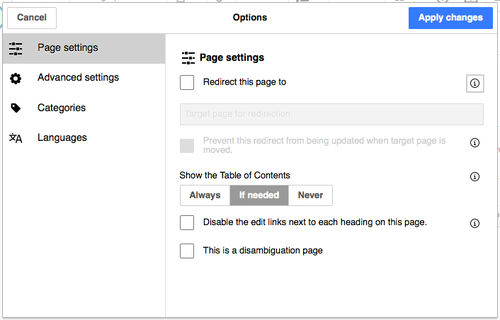
The Налады старонкі menu is to the left of the Апублікаваць зьмены button and the Пераключыць рэдактар menu. On this menu there is a button to open an Налады dialog with the following (left side) tabs:
The tabs of the Налады dialog are also displayed in the Налады старонкі menu and can be opened by clicking on it. Furthermore the Налады старонкі menu contains the items Паказваць зьлева направа or Паказаць справа налева and the item Пошук і замена, which opens a bar, where you can insert words or regular expressions you are searching for and those to replace them with, together with several buttons for options. |
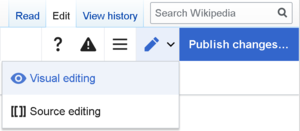
| The Пераключыць рэдактар button is next to the Апублікаваць зьмены button. It allows you to switch to the wikitext editor. | |
Публікацыя зьменаў
Рэдагаваньне спасылак
 |
Спасылкі можна дадаць значкам «Спасылка» (зьвёны ў ланцугу) на панэлі, або ўжыўшы скарот Ctrl+K (або ⌘ Command+K на Mac).
If you select (highlight) text and then press the "Спасылка" button, that text will be used in creating the link. For a link that involves only one word, you can either select that word or just put the cursor within that word. |
 |
Пстрыкнуўшы кнопку або скарыстаўшыся клявіятурным скаротам, вы адкрыеце дыялёг, у якім можна будзе ўвесьці спасылку. Візуальны рэдактар дапаможа вам стварыць унутраную спасылку (на іншыя старонкі ў Вікіпэдыі), шукаючы пасуючыя загалоўкі.
The link tool will try to help with internal links by searching for likely matches. Калі вы ўведзяцё або аберацё спасылку, завяршыце працэс стварэньня спасылкі кнопкай ↵ Enter або кнопкай «Зроблена». Спасылка імгненна зьявіцца на старонцы, але, як і ўсе іншыя зьмены старонкі, ня будзе апублікаваная, пакуль вы не захаваеце старонку цалкам. |
 |
Каб спаслацца на вэб-старонку або вэб-сайт па-за Вікіпэдыяй, выконвайце тыя ж дзеяньні: адкрыйце закладку «Вонкавая бачына» і ўвядзіце адрас старонкі ў поле. |
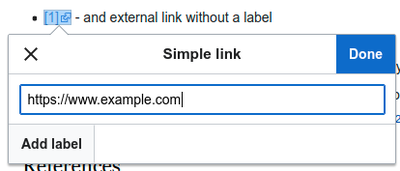 |
External links without labels look like this: [1]. You can add these by placing your cursor away from any word (e.g., after a space). Open the link tool by pressing on the button or pressing the shortcut keys. Type the URL in the box, and press the "Зроблена" button to insert the link. |
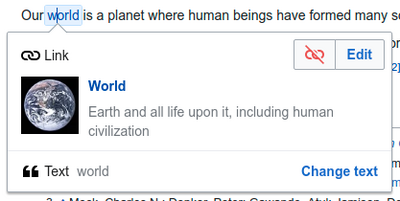 |
Каб зьмяніць ці выдаліць існуючую спасылку, трэба пстрыкнуць па спасылцы ў тэксьце, затым значак «Спасылка», які зьявіцца побач зь ёй. Адкрыецца вакно для рэдагаваньня. Вы можаце таксама адкрыць вакно, націснуўшы Ctrl+K на клявіятуры. When a link is selected, it appears as blue framed.
У дыялёгу рэдагаваньня спасылкі можна зьмяніць адрас, куды вядзе спасылка. Можна таксама выдаліць спасылку націскам на кнопку «Выдаліць» у верхнім правым куце дыялёгу. You can also open the link's target in another window by pressing on the copy of the link in the dialog box. (You might want do this to check if an external link is valid.) If you want to exit the link label (the text displayed as a link) or continue to write after this link, you can press →:
To edit the link label of an existing link, press within the link label and type the new one. But if you want to replace the entire label, please note:
|
Рэдагаваньне зносак
- For further information, see Help using citation templates or Help using citoid's Аўтаматычна tab
Determining which system is in place | |
| Your wiki may use one of three footnote systems. The one shown on the right is the simplest system, where the "Крыніцы" menu does not include any citation templates. If your wiki uses this system, then everything you need to know about footnotes is on this page. |  |
| In the second system, you again start by pressing the Цытаваць button. Then a dialog box opens, which includes several popular citation templates set up for quick access in the "Уручную" tab. If your wiki uses this system, then you will find more details at Help:VisualEditor/User guide/Citations-Templates |  |
| In the third system, you again start by pressing the Цытаваць button. Then a dialog box opens, which includes an automatic citation process using the citoid service under the Automatic tab. If your wiki uses this system, you will find more details at Help:VisualEditor/User guide/Citations-Full | 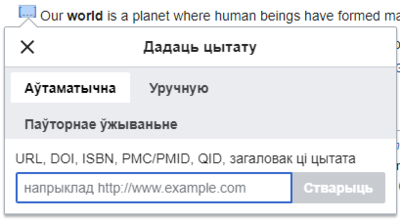 |
|
Рэдагаваньне існуючых зносак | |
| To edit an existing reference, press on it where it appears in the text (usually as a bracketed number). You will see either a "Зноска" icon (bookmark) or an icon (and name) for the template that was used to create this reference. In either case, pressing on the "Рэдагаваць" button will open a dialog where you can edit the reference. |  |
| For the "Зноска" icon, pressing "Рэдагаваць" opens the reference dialog. To start changing the reference information, press on it.
Шмат якія вікі ўжываюць шаблёны для фарматаваньня зносак. Калі вы ўжываеце шаблён у вашай зносцы, увесь тэкст у шаблёне будзе вылучаны, калі вы навядзеце курсор на інфармацыю пра зноску. If a template was used and you press on the reference information, then the Шаблён icon (puzzle piece) will appear with some information. Press on the "Рэдагаваць" button to edit the content of the template in the template editor dialog. |
 |
| If what appears when you press on a reference is an icon for a standard template for citations (an example is at right), then pressing "Рэдагаваць" will open the template editor dialog. |  |
| Inside the template editor, you can add or remove types of information or change current content. Only fields (template parameters) that have content will show, initially. To add fields, press on "Дадаць" at the bottom of the editor. |  |
| Пстрыкніце «Ужыць зьмены», як скончыце. | |
Паўторнае ўжываньне зносак | |
| If the page already contains a citation that applies to the text you want to source, then you can choose to re-use that existing citation.
Каб паўторна выкарыстаць зноску, зьмясьціце курсор у кавалак тэксту, куды хочаце дадаць зноску (нумар). Тады пстрыкніце значак «Паўторна выкарыстаць зноску» з мэню «$cite». (Note: If your wiki has the second or third footnote system described above, you'll see a "Паўторнае ўжываньне" tab, in a dialog, instead of a "Паўторнае ўжываньне" item on the "Крыніцы" menu.) |
 |
| У дыялогавым акне Зноска паглядзіце ў спісе спасылку, якую хочаце выкарыстаць паўторна, і выберыце яе. Калі спасылак шмат, вы можаце выкарыстоўваць поле пошуку (з надпісам «Што хочаце зьмясьціць у зносцы?»), каб пералічыць толькі тыя спасылкі, якія ўключаюць пэўны тэкст. |  |
Даданьне новых зносак | |
| Каб дадаць новую зноску, зьмясьціце курсор туды, куды хочаце дадаць зноску, і пстрыкніце значак «Зноска» (закладка) на панэлі інструмэнтаў. Then click "Базавая". |  |
Using the "Базавая" citation | |
| Shown here is what you will see if you select the basic references item. У рэдактары зносак вы можаце напоўніць і належным чынам аформіць зноску.
Вы можаце далучыць зноску да пэўнай групы. Гэта выкарыстоўваецца для адлюстраваньня асобных груп зносак з дапамогай інструмэнта «Сьпіс зносак». |
 |
| Калі вы ствараеце новую зноску і хочаце дадаць у яе шаблён, пстрыкніце значак «Уключэньне» (кавалак пазла) у панэлі інструмэнтаў рэдактара зносак. | 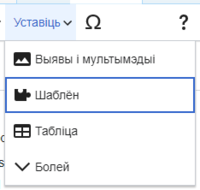 |
| Then, look for the template you want to use, add it and edit it as you would any other template. (See the Editing templates section, below, if you need more information about templates.)
After you are done editing your new template, Па сканчэньні рэдагаваньня пстрыкніце «Ужыць зьмены», каб вярнуцца да рэдактара зносак, і яшчэ раз «Ужыць зьмены», каб вярнуцца да старонкі. |
 |
| Калі старонка яшчэ ня ўтрымлівае сьпіс зносак (напрыклад, вы дадаяце першую зноску), трэба яго дадаць, каб вашая зноска зьявілася.
Зьмясьціце курсор туды, куды вы хочаце дадаць сьпіс зносак (звычайна ўнізе старонкі), і пстрыкніце «Сьпіс зносак» (тры кнігі), каб дадаць яго. |
 |
| Калі вы стварылі асобную групу зносак, вы можаце пазначыць назву групы ў дыялёгу, каб паказаць у сьпісе толькі зноскі з той групы.
The final step in the References list dialog is to press "Уставіць". |
 |
Using standard cite templates | |
| Your local wiki may have added extra citation templates to the "Крыніцы" menu. If so, you have quick access to the most-used citation templates for your wiki. (Instructions for adding extra citation templates to your local wiki are available at VisualEditor/Citation tool.) |  |
| Pressing on a template icon such as "Cite book" will take you into the template editor for that template. Important information fields may be marked with an asterisk. While the most common fields will be shown, not all of them are required. |  |
| To add more parameters, scroll down in the template editor and press on the "Дадаць" option.
Press on "Уставіць" when you are done. |
 |
Editing images and other media files
Uploading images
Editing media galleries
Editing templates
The powerful MediaWiki template system lets you insert dynamic content, text from other pages, and much more. For a detailed explanation and examples, see the Templates help page.
In the VisualEditor you can search for a relevant template, add an invocation or transclusion on the page you’re editing and, if needed, add custom content using parameters.
Insert new template
| Каб дадаць новы шаблён на старонку, зьмясьціце курсор туды, куды хочаце дадаць шаблён, і пстрыкніце значак «Уключэньне» (кавалак пазла) на панэлі інструмэнтаў. Then open the Уставіць menu and select " |
 |
| Find the template you want to insert by typing either its name or a relevant keyword. Results containing the search term in either the name or description will display in a dropdown. This should help you find a relevant template, even if you don’t know its exact name.
If you’re having trouble finding the kind of template you want by using keywords, you can look on other wiki pages with similar content and view or edit the page source to see which templates are in use. When you find the desired template’s name, you can type it into this field to insert it here. |
 |
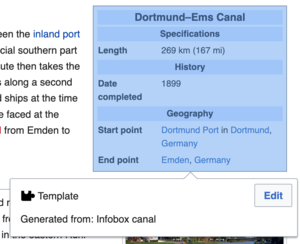
| You can also edit a template that’s already on a page. When you select the template you want to edit, it turns blue, and a box appears displaying " |
 |
| Some templates are not visible to someone reading a page. In the visual editor, such hidden templates are still shown so that you can click and edit or delete them. The name of the template will be shown next to the puzzle icon and both will be grayed out. |  |
Template parameters | |
| You’ll see this dialog box when you’re adding a new template or editing one already in place. What you see in the box depends on whether the template in question contains TemplateData, helpful metadata added by other editors to make it easier to edit templates in the Visual Editor.
When a template contains TemplateData, the VisualEditor can use it to present annotated fields for you to fill in.
|
 |
| You can disable any optional parameter (which have blue checkboxes on the left side). If a parameter’s checkbox is grayed out and not clickable, the template requires that parameter, so it can’t be disabled.
When you insert a new template, you may find that some optional parameters are pre-selected. That means the author(s) of the template recommends the use of those parameters. It’s best to review all parameters that will be used in a template to ensure you understand their use. Clicking an unchecked parameter adds it to the template. Clicking a parameter that’s already been added takes you to the parameter’s input field. Some template parameters will show as “deprecated”. Don’t use deprecated parameters when inserting a template; they’re only visible to you because those parameters are in use on older pages where this template was included. |
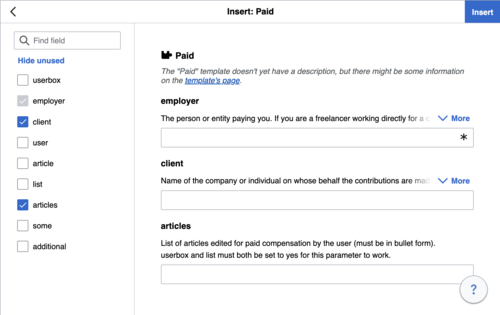 |
Adding undocumented parameters | |
| If you’re inserting or editing a template whose author hasn’t laid out its parameters in TemplateData, it has what we call “undocumented” or “unnamed parameters”. In these cases, you should consult the page for the template itself. There you can learn how to correctly employ and work with all of the template’s parameters. This includes learning the exact names of the parameters as written by the template author.
If you find in the documentation that the template expects parameters without names, fill in numbers as placeholders for the parameter names using the undocumented parameter input, then add text to the values you want to provide as you normally would. Example:
If you accidentally include nonexistent, misspelled or erroneous parameters, the values you enter for those parameters won’t show up on the page you’re editing. |
 |
Autogenerated parameters | |
| In this example, the template in question lacks TemplateData but it was possible to autogenerate the parameters. This means that the undocumented parameters have already been added for you, but the names may not be easily understandable and the dialog cannot display any directions or descriptions. As a result the dialog box provides a link to the template’s documentation, which should help you deduce and fill in the template’s various parameters. |  |
Editing multi-part template content | |
| During editing, you may open template content consisting of multiple templates or a single template linked to some wikitext. This differs from the nested templates described below. In this case, the templates are better visualized as being stacked or connected.
This content often contains “unbalanced templates,” templates which are incomplete on their own and need to be paired with some wikitext or another template in order to function. These related pieces of template content must be created in wikitext, but can be edited in the VisualEditor. In these cases you will see a notice at the top of the dialog to signal the situation and a specialized toolbar will be visible at the bottom of the sidebar. There you can use the icon buttons to add additional templates, additional wikitext, delete elements or change their order. |
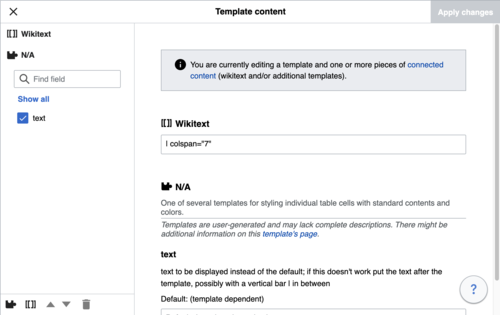 |
Nested templates | |
| Templates can include other templates as the value for parameters. You’ll recognize it when you see a parameter whose value contains the double curly braces ( {{ }} ) denoting a template.
The VisualEditor can’t present this template within a template (a nested template) using the editor’s easy-to-use interface, so if you want to nest a template yourself, you’ll need to understand how to add the template by hand in wikitext into the appropriate parameter field. |
 |
Completing your edit | |
| When you have finished editing a template, you can click "Ужыць зьмены". Then you can preview your edit and make sure it looks the way you want and expect.
You may also see an error message, which (like the other TemplateData mentioned above) is community-provided content and may vary in usefulness. You may need to consult the template’s own documentation to get to the bottom of some errors. If you’re still having trouble, consider posting about your problem on the template’s talk page. |
|
Removing a template | |
| To remove a template in the VisualEditor, click the template box. Press the "Delete" or "Backspace" key on your keyboard. The template will disappear from the page. |  |
Editing on mobile | |
| When editing a template on a page using the VisualEditor on a mobile device, you’ll see that the sidebar starts out hidden. You can make it visible by pressing the “Show/hide options” button. |  |
Падстаноўка шаблёнаў | |
| When you insert a template in a wiki page, its content and appearance are reevaluated every time the page loads, based on the template code and the values of its parameters. This means if someone updates the code of a template, then every page which uses that template will also get updated when they publish.
There’s another, much less common way to use templates, though, and that’s to substitute a template. Doing this permanently includes the template content just as it appears at the moment you insert it. It will not update if the template code is later changed. Most users won’t ever need to resort to substitution. Substitution is typically only useful when you need to capture the exact appearance of one version of a template, such as when content is under development and needs evaluation. To substitute a template in the VisualEditor, insert a template using the name syntax When you’re finished, press “Уставіць”, which will insert the template content as you see it. |
 |
Editing lists
Editing tables
Рэдагаваньне катэгорыяў
 |
To edit categories, on the "Налады старонкі" menu, press the "Катэгорыі" item. |
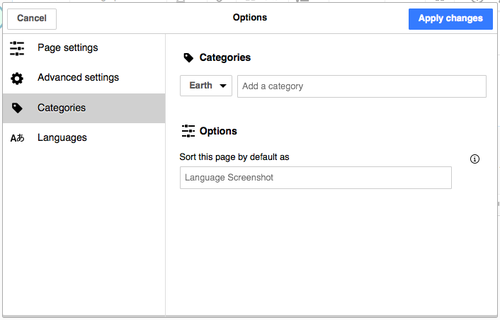 |
Кнопка «Катэгорыі» адкрые дыялёг, у якім будуць пералічаныя існыя катэгорыі. Там жа можна дадаць новыя катэгорыі.
You also have the option of setting or changing the general (default) sorting key, which determines where the page appears when listed with other pages in the same category. For example, the default sorting key for the article "George Washington" is "Washington, George". In the category "Presidents of the United States", the article is listed under the letter "W", not the letter "G". |
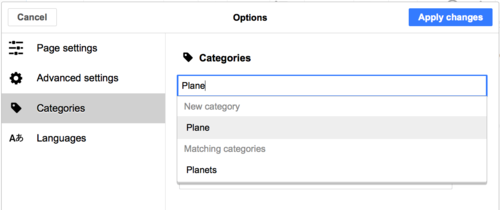 |
To add a category for a page, type the name of the category into the field "Дадаць катэгорыю". As you type, the visual editor will search for possible matching, existing categories. You can either select an existing category, or you can add a category that doesn't yet have its own category page. (Until that category page is created, your new category will show as a red link after you publish all your editing changes.) |
 |
Каб выдаліць прысутную на старонцы катэгорыю, пстрыкніце яе — у адчыненым дыялёгу пстрыкніце значак «Выдаліць» (сьметнік).
Pressing on a category also allows you to specify a sorting key for that specific category. Such a sorting key overrides the default sorting key. |
| Пстрыкніце «Ужыць зьмены», як скончыце рэдагаваць катэгорыі, і вы зможаце вярнуцца да рэдактара старонкі. | |
Editing page settings
Editing maps
 |
You can add and change maps. See Help:VisualEditor/Maps. |
Editing mathematical formulae
Editing musical scores
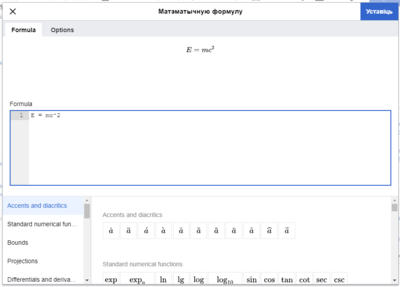
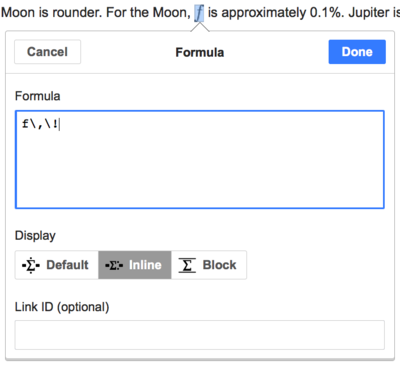
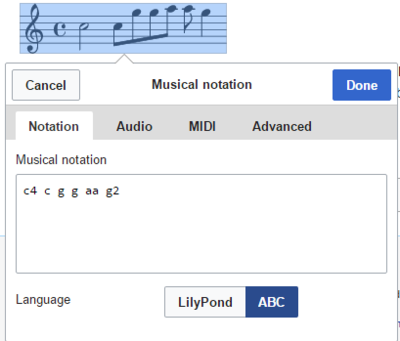
Рэдагаваньне матэматычных формул і іншых аб’ектаў
Switching between the visual and wikitext editors
Клявіятурныя скароты
Многія рэдактары звыклі працаваць наўпрост зь вікітэкстам, асабіста што лічыцца тоўстага і курсіўнага афармленьняк, гэтак жа як і спасылак. З клявіятурнымі скаротамі зьнікае патрэба пстрыкаць кнопкі на панэлі ўвесь час. У візуальным рэдактары працуюць асноўныя скароты, як і тыя, якія ўжываюць іншыя рэдактары:
| Скарот на PC | Дзеяньне | Скарот на Mac |
|---|---|---|
| Ctrl+B | Тоўсты | ⌘ Cmd+B |
| Ctrl+I | Курсіў | ⌘ Cmd+I |
| Ctrl+K | Уставіць спасылку | ⌘ Cmd+K |
| Ctrl+X | Выняць | ⌘ Cmd+X |
| Ctrl+C | Капіяваць | ⌘ Cmd+C |
| Ctrl+V | Уставіць | ⌘ Cmd+V |
| Ctrl+Z | Скасаваць | ⌘ Cmd+Z |
Also see the full list of all keyboard shortcuts.

