Tulong:VisualEditor/Alagaden ti agar-aramat
| Note: When you edit this page, you agree to release your contribution under the CC0. See Public Domain Help Pages for more info. |
| VisualEditor portal |
|---|
 |
| General |
| Maipanggep |
| Tumulong iti panangiruar |
| No kayat ti agipadas iti VisualEditor a saan nga agurnos iti maysa nga artikulo, adda ditoy ti panid a nawayka a mangsubok daytoy. Saanmo a masapul iti pakabilangan tapno agusar iti VisualEditor iti dayta a panid. |
Panaglukat ti VisualEditor
Mangrugrugi: ti baras ti ramit ti VisualEditor
| Ti baras ti ramit ti VisualEditor ket agparang dita ngato ti plantalia no mangrugika nga agurnos babaen ti VisualEditor. Daytoy ket mangiraman kadagiti pamiliar nga ikono: | |
| Ibabawi ken Aramiden manen dagiti binaliwam nga inaramidmo. | |
 |
Headings pull-down menu: allows you to change how the paragraph is formatted. To change the style of a paragraph, put your cursor in the paragraph and select an item in this menu (you don't have to highlight any text). Section titles are formatted "Paulo", and subsections are "Sub-paulo 1", "Sub-paulo 2", and so on. Ti kadawyan a pormat para iti testo ket "Parapo". |
 |
Panagporma: Ti panagpindut ti "A" ket manglukat iti menu.
If you have not selected any text, then when you press the "A" to open the menu, and then select an item, that formatting will apply to the text that you start typing, from wherever your cursor is located. |
 |
Ramit ti panagisilpo: Ti kawar ket ti ramit ti panagisilpo. Ti panagpindut daytoy (kadawyan a kalpasan ti panagpili iti testo) ket lukatanna ti dialogo ti silpo. |
 |
Menu ti Dakamaten: Ti menu ti "Dakamaten" ket inus-usar a manginayon kadagiti nailinia a dakamat (makunkuna pay a dagiti "footnotes" wenno "reperensias"). Amin dagiti gandat ket makaserrek iti "$basic" a panagpormat ti reperensia ken ti abilidad iti "$re-use" kadagiti dakamat, nga agusar iti daytoy a menu. Daytoy a menu ket mangited kenka iti napardas a panagserrek kadagiti lokal a plantilia ti dakamat, no daytoy ket napakabaelan idiay wikim. |
 |
Dakamaten button: If the Citoid service and/or citation tool is enabled on your wiki, you will see a Dakamaten button instead of a Dakamaten menu.
(Dagiti pakaammo ti panaginayon kadagiti lokal a plantilia ti dakamat iti menu ti Manual iti naisangayan a wiki ket magun-od idiay VisualEditor/Citation tool.) Instructions for enabling the Automatiko tab are available at Enabling Citoid on your wiki The citoid service tries to fill out citation templates automatically. |
 |
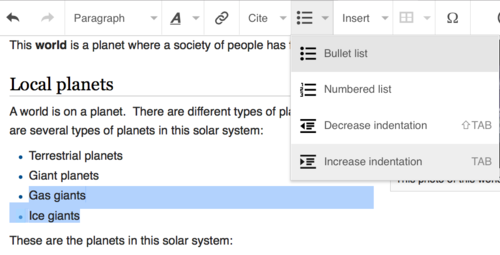
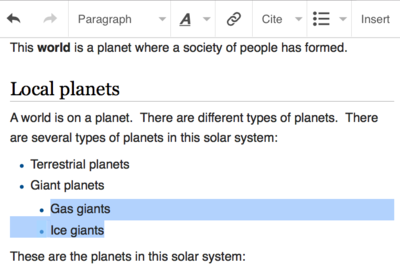
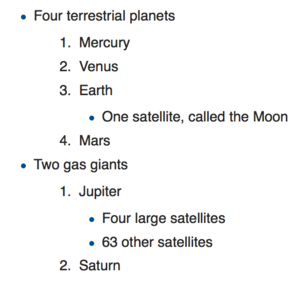
Dagiti listaan ken panagilennek: Dagiti dua nga umuna a banag ket mangpalubos kenka a mangpormat ti esto a kas "Punglo a listaan" wenno "Nabilangan a listaan". Dagiti dua a naudi a banag ket mangpalubos kenka a mangpabassit wenno mangipaadu ti agpang ti lennek dagiti banag ti listaan. |
 |
Isengngat: Ti menu ti "Isengngat" ket mabalin a sabali kadagiti dadduma a gandat. Dita baba ket listaan dagiti amin a pagpilian a mabalin nga agparang.
|
| Panangisengngat ti espesial a karakter: Ti ikono ti "Naipangpangruna a karakter" iti menu ti "Isengngat" , no mapindut, ket agiparang ti dialogo a mangipakita kadagiti adu nga espesial a karakter. Babaen ti panagpindut iti naisangayan a karakter, ikabilmo dayta iti testo. Dagitoy nga espesial a karakter ket mangiraman kadagiti pagalagadan a simbolo, dagiti tuldek, ken dagiti simbolo ti matematika. (Daytoy a listaan ket mabalin a lokal a maiduma. Kitaen ti VisualEditor/Special characters para kadagiti pakaammo.) | |
| The Edit notices button displays any notices for the page. | |
 |
The Dagiti pagpilian a panid menu is to the left of the Ipablaak dagiti binaliwan button and the Switch editor menu. On this menu there is a button to open an Dagiti pagpilian dialog with the following (left side) tabs:
The tabs of the Dagiti pagpilian dialog are also displayed in the Dagiti pagpilian a panid menu and can be opened by clicking on it. Furthermore the Dagiti pagpilian a panid menu contains the items View as left-to-right or View as right-to-left and the item Sapulen ken sukatan, which opens a bar, where you can insert words or regular expressions you are searching for and those to replace them with, together with several buttons for options. |
| The Switch editor button is next to the Ipablaak dagiti binaliwan button. It allows you to switch to the wikitext editor. | |
Panagidulin kadagiti binaliwan
Panagurnos kadagiti silpo
 |
Dagiti silpo ket mabalin a mainayon babaen ti ikono ti "Silpo" (silsilpo iti kawar) iti baras ti ramit, wenno babaen ti panagusar ti apat Ctrl+K (wenno ⌘ Command+K iti Mac).
If you select (highlight) text and then press the "Silpo" button, that text will be used in creating the link. For a link that involves only one word, you can either select that word or just put the cursor within that word. |
 |
No usarem ti buton wenno ti apat, aglukatto ti dialogo ken mabalinno nga imakinilia ti silpo.
Ti VisualEditor ket mangpadas a tumulong kadagiti internal a silpo para kadagiti kapada no rugiam ti agimakinilnia. No nalpaskan a nangikabil wenno nakapili ti silpo, makompleton ti proseso ti panangisilpo babaen ti panagtalmeg ti ↵ Enter, ti panagtalmeg ti buton ti "Nalpasen" , wenno ti panagtalmeg ti ruar ti kahon. Ti silpom ket dagusto a maiparang iti panid ti VisualEditor, ngem saanto a maidulin aginggana no idulinmo ti intero a panid. |
 |
Ti panangisilpo iti maysa a panid ti web iti sabali a website, agpada met laeng ti proseso; ikabilmo ti URL iti kahon, ken mainayonto a kas "Akinruar a silpo". |
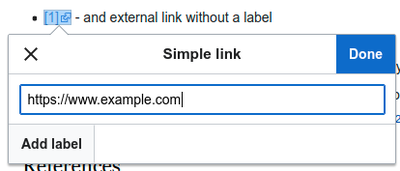 |
Dagiti akinruar a silpo nga awan kadagiti etiketa ket kasla daytoy ti kitana: [1]. You can add these by placing your cursor away from any word (e.g., after a space). Open the link tool by pressing on the button or pressing the shortcut keys. Type the URL in the box, and press the "Nalpasen" button to insert the link. |
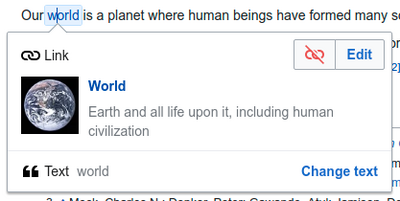 |
To change or remove an existing link, press within the text for that link, then press the "Silpo" icon that appears near it. The dialog will appear, for editing. You can also get to the dialog with the Ctrl+K keyboard shortcut. When a link is selected, it appears as blue framed.
Mabalinmo nga urnosen ti puntaan ti silpo, wenno ikkatem amin ida babaen ti panagtalmeg ti ikono ti 'Ikkaten' (basura) iti suli ti kanawan a ngato ti dialogo. You can also open the link's target in another window by pressing on the copy of the link in the dialog box. (You might want do this to check if an external link is valid.) If you want to exit the link label (the text displayed as a link) or continue to write after this link, you can press →:
To edit the link label of an existing link, press within the link label and type the new one. But if you want to replace the entire label, please note:
|
Panag-rnos kadagiti reperensia
- For further information, see Help using citation templates or Help using citoid's Automatiko tab
Determining which system is in place | |
| Your wiki may use one of three footnote systems. The one shown on the right is the simplest system, where the "Dakamaten" menu does not include any citation templates. If your wiki uses this system, then everything you need to know about footnotes is on this page. |  |
| In the second system, you again start by pressing the Dakamaten button. Then a dialog box opens, which includes several popular citation templates set up for quick access in the "Manual" tab. If your wiki uses this system, then you will find more details at Help:VisualEditor/User guide/Citations-Templates |  |
| In the third system, you again start by pressing the Dakamaten button. Then a dialog box opens, which includes an automatic citation process using the citoid service under the Automatic tab. If your wiki uses this system, you will find more details at Help:VisualEditor/User guide/Citations-Full |  |
|
Panag-urnos ti addan a reperensia | |
| To edit an existing reference, press on it where it appears in the text (usually as a bracketed number). You will see either a "Reperensia" icon (bookmark) or an icon (and name) for the template that was used to create this reference. In either case, pressing on the "Urnosen" button will open a dialog where you can edit the reference. |  |
| For the "Reperensia" icon, pressing "Urnosen" opens the reference dialog. To start changing the reference information, press on it.
Adu kadagiti wiki nga agus-usar kadagiti plantilia tapno mangporma kadagiti reperensia segun ti naisangayan nga alagaden. Mabalinmo a maammuan daytoy no agurnoska ti maysa nga addan a reperensia a ti linaonnna ket agbalin nga asul no piliem daytoy. If a template was used and you press on the reference information, then the Plantilia icon (puzzle piece) will appear with some information. Press on the "Urnosen" button to edit the content of the template in the template editor dialog. |
 |
| If what appears when you press on a reference is an icon for a standard template for citations (an example is at right), then pressing "Urnosen" will open the template editor dialog. |  |
| Inside the template editor, you can add or remove types of information or change current content. Only fields (template parameters) that have content will show, initially. To add fields, press on "Add" at the bottom of the editor. |  |
| Press on "Ipakat dagiti binalbaliwan" when you are done. | |
Panag-usar manen kadagiti addan a reperensia | |
| If the page already contains a citation that applies to the text you want to source, then you can choose to re-use that existing citation.
Tapno mausar manen ti addan a reperensia, ikabilmo ti pangitudom iti lugar a kayatmo a pangikabilan ti testo, ken pinduten ti ikono ti "Reperensia" (marka ti libro) iti baras ti ramit. (Note: If your wiki has the second or third footnote system described above, you'll see a "Usaren manen" tab, in a dialog, instead of a "Usaren manen" item on the "Dakamaten" menu.) |
 |
| No adu met dagiti reperensia, mabalinmo nga usaren ti baras a pagbirukan (nanaganan ti "Ania kadi ti kayatmo nga ireperensia?") tapno maiparang laeng dagiti reperensia a maipada ti naited a testo. |  |
Panagnayon ti baro a reperensia | |
| Tapno makanayon ti baro a reperensia, ikabilmo ti panagitudom iti lugar a kayatmo a panginayonan ti testo, ke pindutem ti ikono ti "Reperensia" (marka ti libro) iti baras ti ramit. Then click "Batayan". |  |
Using the "Batayan" citation | |
| Shown here is what you will see if you select the basic references item. Idiay editor ti reperensia, mabalinmo ti aginayon, agurnos ken agpormat ti dakamatmo.
Mabalinmo nga aramiden ti reperensia amaitagikua iti naited a grupo; daytoy ket mausar a mangiparang kadagiti grupo dagiti reperensia a a mangparang iti ramit ti "Listaan ti reperensia" . |
 |
| No aginaynayonka ti baro a reperensia ken kayatmo ti manginayon ti plantiliana, pinduten ti ikono ti Panagilak-am (pirgis ti puzzle) idiay baras ti ramit ti editor ti reperensia. |  |
| Kalpasanna, birukem ti plantilia a kayatmo nga usaren, inayonmo ken unosem met laeng a kas ti maysa nga addan.
Pinduten ti "Ipakat dagiti sinuksukatan" tapno makasubli iti editor ti reperensia, ken uliten manen nga "Ipakat dagiti sinuksukatan" tapno makasubli iti panid. |
 |
| No awan pay ti listaan dagiti reperensia iti panid (kas pagarigan, no aginaynayonka ti immuna a reperensia iti panid), nasken nga inayonmo tapno maiparang ti testo iti reperensiam.
Ikabilmo ti panagitudom iti lugar a kayatmo nga iparang dagiti reperensia (kadawyan nga iti baba ti panid), ken pinduten ti ikono ti "Lisaan ti reperensia" (tallo a libro) tapno mainayonmo. |
 |
| No nagpartuatka kadagiti grupo ti reperensia, mabalinmo nga ibaga ti grupo iti daytoy a dialogo, tapno makapili nga agiparang kadagiti reperensia a tagikua daytoy.
The final step in the References list dialog is to press "Isengngat". |
 |
Using standard cite templates | |
| Your local wiki may have added extra citation templates to the "Dakamaten" menu. If so, you have quick access to the most-used citation templates for your wiki. (Instructions for adding extra citation templates to your local wiki are available at VisualEditor/Citation tool.) |  |
| Pressing on a template icon such as "Cite book" will take you into the template editor for that template. Important information fields may be marked with an asterisk. While the most common fields will be shown, not all of them are required. |  |
| To add more parameters, scroll down in the template editor and press on the "Add" option.
Press on "Isengngat" when you are done. |
 |
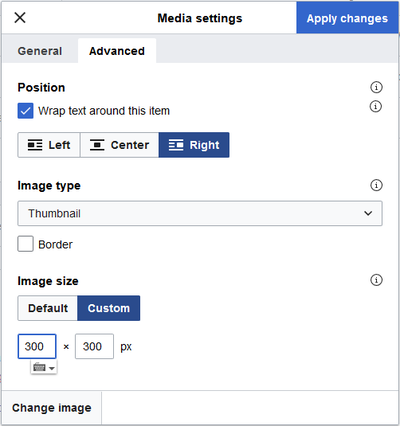
Editing images and other media files
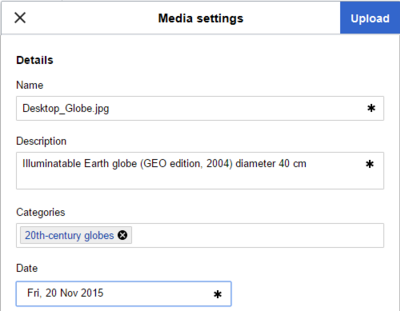
Uploading images
Editing media galleries
Editing templates
The powerful MediaWiki template system lets you insert dynamic content, text from other pages, and much more. For a detailed explanation and examples, see the Templates help page.
In the VisualEditor you can search for a relevant template, add an invocation or transclusion on the page you’re editing and, if needed, add custom content using parameters.
Insert new template
| Ti panaginayon ti baro a plantilia iti panid , ikabilmo ti panagitudom iti lugara kayatmo a pakaisengngatan ti plantilia, ken pinduten ti ikono ti "Panagilak-am" (pirgis ti puzzle) iti baras ti ramit. Then open the Isengngat menu and select " |
 |
| Find the template you want to insert by typing either its name or a relevant keyword. Results containing the search term in either the name or description will display in a dropdown. This should help you find a relevant template, even if you don’t know its exact name.
If you’re having trouble finding the kind of template you want by using keywords, you can look on other wiki pages with similar content and view or edit the page source to see which templates are in use. When you find the desired template’s name, you can type it into this field to insert it here. |
 |
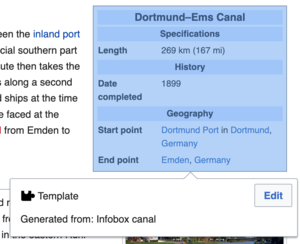
| You can also edit a template that’s already on a page. When you select the template you want to edit, it turns blue, and a box appears displaying " |
 |
| Some templates are not visible to someone reading a page. In the visual editor, such hidden templates are still shown so that you can click and edit or delete them. The name of the template will be shown next to the puzzle icon and both will be grayed out. |  |
Template parameters | |
| You’ll see this dialog box when you’re adding a new template or editing one already in place. What you see in the box depends on whether the template in question contains TemplateData, helpful metadata added by other editors to make it easier to edit templates in the Visual Editor.
When a template contains TemplateData, the VisualEditor can use it to present annotated fields for you to fill in.
|
 |
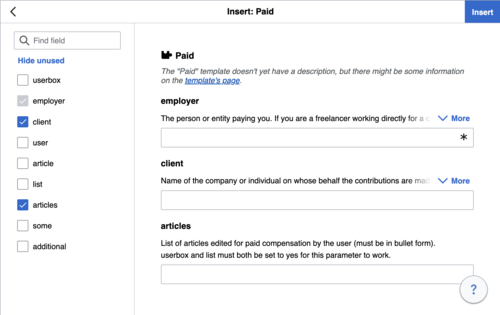
| You can disable any optional parameter (which have blue checkboxes on the left side). If a parameter’s checkbox is grayed out and not clickable, the template requires that parameter, so it can’t be disabled.
When you insert a new template, you may find that some optional parameters are pre-selected. That means the author(s) of the template recommends the use of those parameters. It’s best to review all parameters that will be used in a template to ensure you understand their use. Clicking an unchecked parameter adds it to the template. Clicking a parameter that’s already been added takes you to the parameter’s input field. Some template parameters will show as “deprecated”. Don’t use deprecated parameters when inserting a template; they’re only visible to you because those parameters are in use on older pages where this template was included. |
 |
Adding undocumented parameters | |
| If you’re inserting or editing a template whose author hasn’t laid out its parameters in TemplateData, it has what we call “undocumented” or “unnamed parameters”. In these cases, you should consult the page for the template itself. There you can learn how to correctly employ and work with all of the template’s parameters. This includes learning the exact names of the parameters as written by the template author.
If you find in the documentation that the template expects parameters without names, fill in numbers as placeholders for the parameter names using the undocumented parameter input, then add text to the values you want to provide as you normally would. Example:
If you accidentally include nonexistent, misspelled or erroneous parameters, the values you enter for those parameters won’t show up on the page you’re editing. |
 |
Autogenerated parameters | |
| In this example, the template in question lacks TemplateData but it was possible to autogenerate the parameters. This means that the undocumented parameters have already been added for you, but the names may not be easily understandable and the dialog cannot display any directions or descriptions. As a result the dialog box provides a link to the template’s documentation, which should help you deduce and fill in the template’s various parameters. |  |
Editing multi-part template content | |
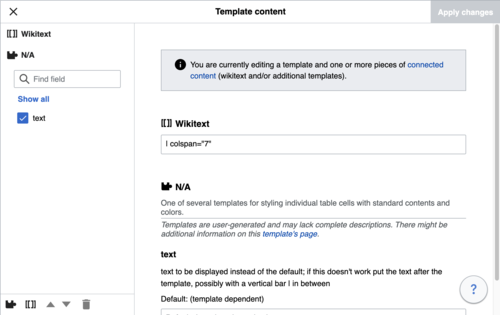
| During editing, you may open template content consisting of multiple templates or a single template linked to some wikitext. This differs from the nested templates described below. In this case, the templates are better visualized as being stacked or connected.
This content often contains “unbalanced templates,” templates which are incomplete on their own and need to be paired with some wikitext or another template in order to function. These related pieces of template content must be created in wikitext, but can be edited in the VisualEditor. In these cases you will see a notice at the top of the dialog to signal the situation and a specialized toolbar will be visible at the bottom of the sidebar. There you can use the icon buttons to add additional templates, additional wikitext, delete elements or change their order. |
 |
Nested templates | |
| Templates can include other templates as the value for parameters. You’ll recognize it when you see a parameter whose value contains the double curly braces ( {{ }} ) denoting a template.
The VisualEditor can’t present this template within a template (a nested template) using the editor’s easy-to-use interface, so if you want to nest a template yourself, you’ll need to understand how to add the template by hand in wikitext into the appropriate parameter field. |
 |
Completing your edit | |
| When you have finished editing a template, you can click "Ipakat dagiti binalbaliwan". Then you can preview your edit and make sure it looks the way you want and expect.
You may also see an error message, which (like the other TemplateData mentioned above) is community-provided content and may vary in usefulness. You may need to consult the template’s own documentation to get to the bottom of some errors. If you’re still having trouble, consider posting about your problem on the template’s talk page. |
|
Removing a template | |
| To remove a template in the VisualEditor, click the template box. Press the "Delete" or "Backspace" key on your keyboard. The template will disappear from the page. |  |
Editing on mobile | |
| When editing a template on a page using the VisualEditor on a mobile device, you’ll see that the sidebar starts out hidden. You can make it visible by pressing the “Show/hide options” button. |  |
Pangisukat kadagiti plantilia | |
| When you insert a template in a wiki page, its content and appearance are reevaluated every time the page loads, based on the template code and the values of its parameters. This means if someone updates the code of a template, then every page which uses that template will also get updated when they publish.
There’s another, much less common way to use templates, though, and that’s to substitute a template. Doing this permanently includes the template content just as it appears at the moment you insert it. It will not update if the template code is later changed. Most users won’t ever need to resort to substitution. Substitution is typically only useful when you need to capture the exact appearance of one version of a template, such as when content is under development and needs evaluation. To substitute a template in the VisualEditor, insert a template using the name syntax When you’re finished, press “Isengngat”, which will insert the template content as you see it. |
 |
Editing lists
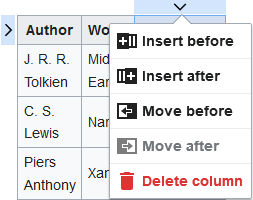
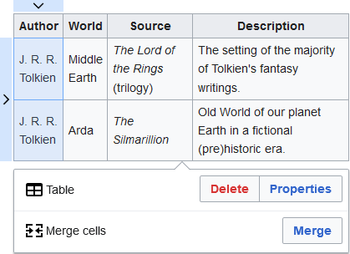
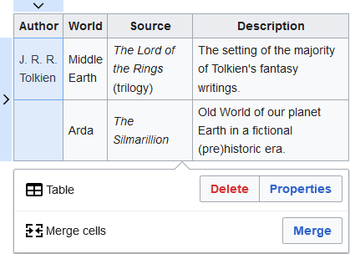
Editing tables
Panag-urnos kadagiti kategoria
 |
To edit categories, on the "Dagiti pagpilian a panid" menu, press the "Katkategoria" item. |
 |
Ti buton ti "Katkategoria" ket manglukat ti dialogo a mangilista kadagiti addan a kategoria ken mangpalubos kenka a manginayon kadagiti baro.
You also have the option of setting or changing the general (default) sorting key, which determines where the page appears when listed with other pages in the same category. For example, the default sorting key for the article "George Washington" is "Washington, George". In the category "Presidents of the United States", the article is listed under the letter "W", not the letter "G". |
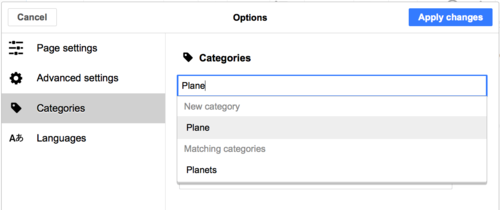 |
To add a category for a page, type the name of the category into the field "Agnayon iti kategoria". As you type, the visual editor will search for possible matching, existing categories. You can either select an existing category, or you can add a category that doesn't yet have its own category page. (Until that category page is created, your new category will show as a red link after you publish all your editing changes.) |
 |
Ti panangikkat ti addan a kategoria, pinduten ti ikono ti "Ikkaten" (basura) iti dialogo a malukatan.
Pressing on a category also allows you to specify a sorting key for that specific category. Such a sorting key overrides the default sorting key. |
| Pinduten ti "Ipakat dagiti binalbaliwan" no nalpaskan nga agur-urnos kadagiti kategoria tapno makasubli iti editor ti panid. | |
Editing page settings
Editing maps
 |
You can add and change maps. See Help:VisualEditor/Maps. |
Editing mathematical formulae
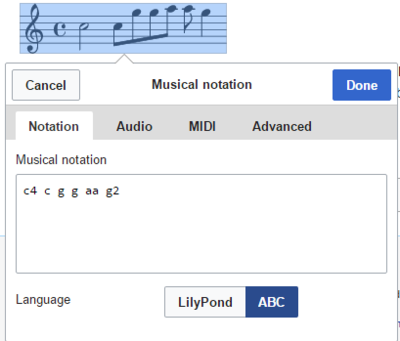
Editing musical scores
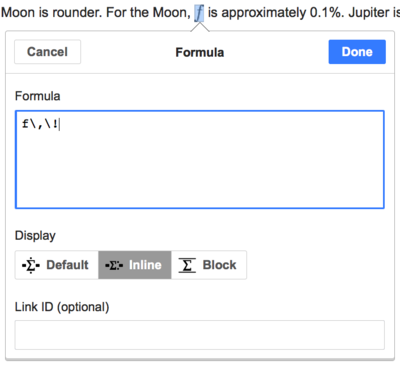
Panag-urnos ti pormula ti matematika ken naipangruna a banbanag
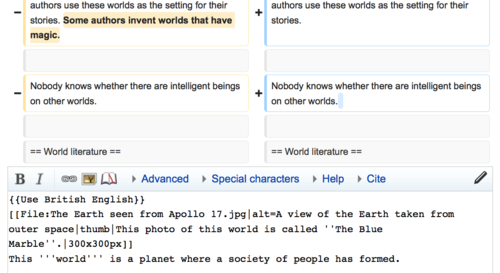
Switching between the visual and wikitext editors
Dagiti apat ti teklado
Adu met dagiti editor a nasansan nga agus-usar ti panangikabil ti dagus a wikitext, a naipangpangruna ti napuskol, italiko ken dagiti silpo ti wiki. Dagiti apat ti teklado ket mangpalubos ti nadaras a panangisengngat ti maipada a pormat a saan nga agpindut kadagiti buton ti baras ti ramit. Dagiti kadawyan ng apat, ken dagiti inususar babaen dagiti editor, ket mabalin iti VisualEditor:
| Apat ti PC | Aksion | Apat ti Mac |
|---|---|---|
| Ctrl+B | Napuskol | ⌘ Cmd+B |
| Ctrl+I | Italiko | ⌘ Cmd+I |
| Ctrl+K | Isengngat ti silpo | ⌘ Cmd+K |
| Ctrl+X | Ikkaten | ⌘ Cmd+X |
| Ctrl+C | Kopiaen | ⌘ Cmd+C |
| Ctrl+V | Ipigket | ⌘ Cmd+V |
| Ctrl+Z | Ukasen | ⌘ Cmd+Z |
Also see the full list of all keyboard shortcuts.


